- +91 9904662794
- hello@assaptr.com
- Maple Trade Centre, Memnagar, Ahmedabad, Gujarat 380052
How to Change Image Size in WordPress Blog Post?
How to Change Image Size in WordPress Blog Post?

Feb 15th, 2025
By, Editorial Team
WordPress
Images are essential for engaging readers and enhancing the visual appeal of your WordPress blog posts. Optimizing image size is crucial for both user experience and website performance.
Large images can slow down your site, negatively impacting SEO and bounce rates. This post guides you through various methods for resizing images within your WordPress blog posts, ensuring your content looks great and loads quickly.
We’ll explore several practical methods, from simple adjustments within the WordPress editor to more advanced plugin techniques. By the end, you’ll be equipped to optimize images for maximum impact and improved website performance, benefiting readers and SEO.
Which is the Preferred Image Size in a WordPress Blog Post?
Choosing the right image size for your WordPress blog posts is crucial for both visual appeal and site performance. While there’s no single “perfect” size, understanding the interplay between image dimensions, file size, and responsive design is key. Optimizing images ensures they look great on all devices without slowing down your website.
- Width: Aim for a width that complements your blog’s content area. Common widths range from 600 to 1200 pixels, depending on your theme. Consider the layout and how much space is available for images.
- Height: Height is more flexible and depends on the image content. Maintain the aspect ratio to avoid distortion. For featured images, check your theme’s recommended dimensions.
- File Size: Keep file sizes as small as possible without sacrificing quality. Large files slow down page load times. Optimize images using compression tools before uploading.
- Format: Use appropriate image formats. JPEG is generally good for photos, while PNG is better for graphics with transparency. WebP is a modern format offering excellent compression.
- Responsiveness: Ensure images scale properly on different devices. WordPress handles this to some extent, but using appropriately sized images from the start is important.
Ultimately, the best image size balances visual clarity with optimal file size. Testing different sizes and formats will help you find the sweet spot for your blog. Prioritizing efficient image handling ensures a positive experience for your readers and improves your site’s overall performance.
5 Methods to Change Image Size in WordPress Blog Posts
Managing image sizes effectively is essential for optimizing WordPress blog posts. Whether you’re making minor adjustments or performing bulk changes, WordPress offers several built-in tools and external plugins to streamline the process.
Understanding these different methods empowers content creators, even those without deep technical expertise, to control how images appear and impact website performance.
Even WordPress experts leverage these techniques to ensure optimal image handling. This guide will walk you through five key methods for resizing images within your WordPress blog posts.
Method 1: WordPress Editor (Block Editor)
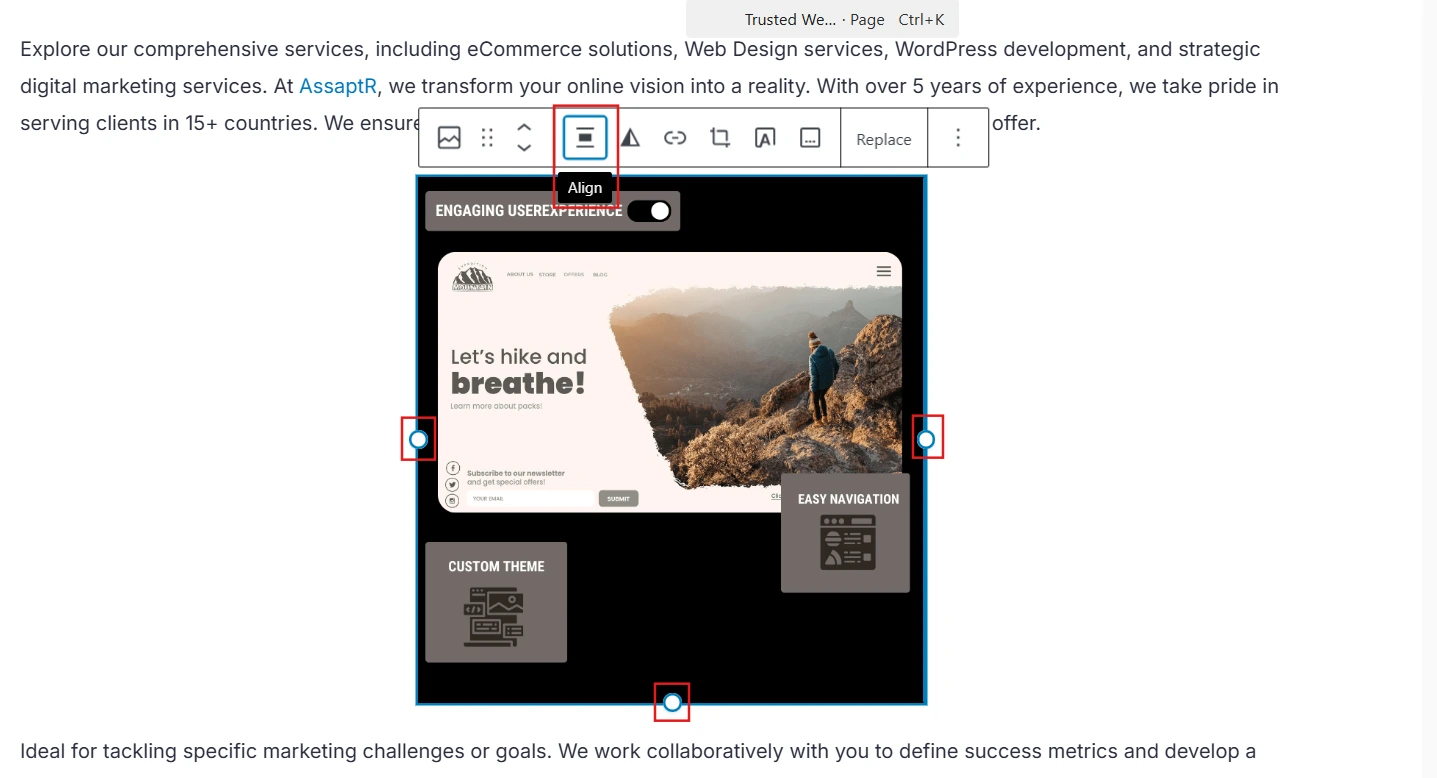
The WordPress Block Editor (Gutenberg) offers a convenient way to resize images directly within your posts. This visual approach is ideal for quick adjustments and provides immediate feedback on how changes affect the layout. While not as precise as other methods, it’s a great option for simple resizing needs.
- Click and Drag: Select the image block and drag the handles at the corners or sides to resize.
- Alignment: Use the alignment options in the block toolbar to position the image (left, center, right).
- Image Styles: Choose from different image styles (e.g., rounded corners) if your theme supports them.
- Caption: Add a caption directly below the image within the block.
- Dimensions: While you can drag to resize, the block toolbar sometimes offers specific dimension input fields for more control.
This method is perfect for quick, on-the-fly image adjustments within your content. It’s a straightforward way to ensure images fit well within your posts. However, for more precise control over dimensions or bulk changes, consider the other methods discussed in this guide.
Method 2: Image Settings in the Media Library
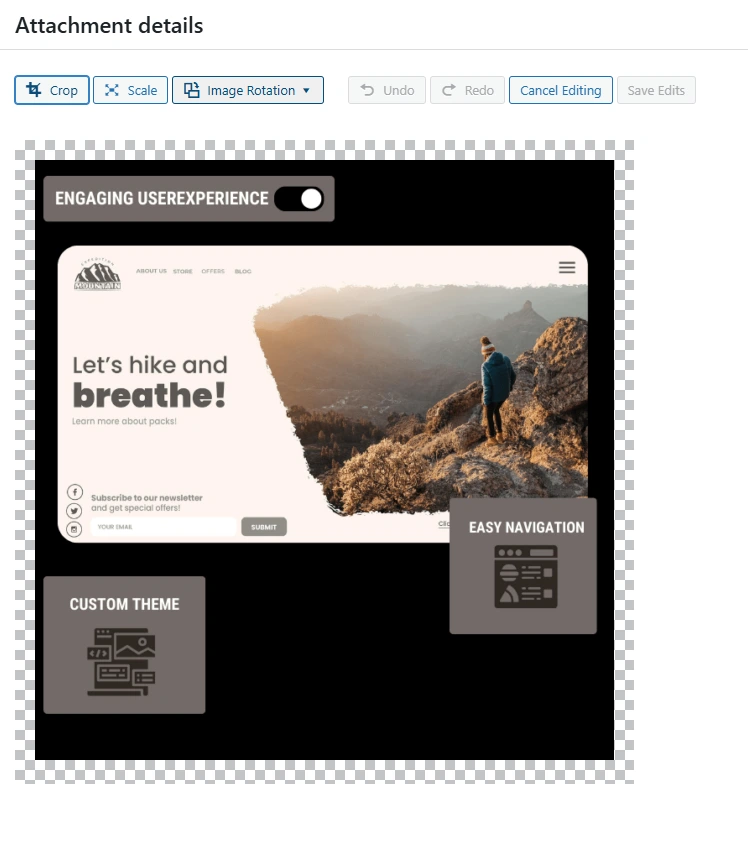
The WordPress Media Library provides a centralized hub for managing all your media files, including images. Beyond simply storing your images, it offers tools to edit and control how those images are used within your posts. This method is particularly useful for selecting pre-defined image sizes and making adjustments that affect all instances of an image.
- Access the Media Library: Navigate to “Media” in your WordPress dashboard.
- Select the Image: Click on the image you want to resize or edit.
- Edit Image: Click the “Edit Image” button.
- Resizing Options: You’ll see options to scale the image proportionally or crop it to specific dimensions.
- Thumbnail Settings: You can regenerate thumbnails if needed, ensuring they reflect the changes.
- Image Metadata: Within the Media Library, you can also edit image metadata like alt text, captions, and descriptions, which are crucial for accessibility and SEO.
The Media Library offers a good balance of control and ease of use. It’s ideal for choosing which of the automatically generated image sizes to use in your posts. Furthermore, editing images here affects all instances where that image is used, ensuring consistency across your website.
Method 3: WordPress Customizer (For Featured Images)
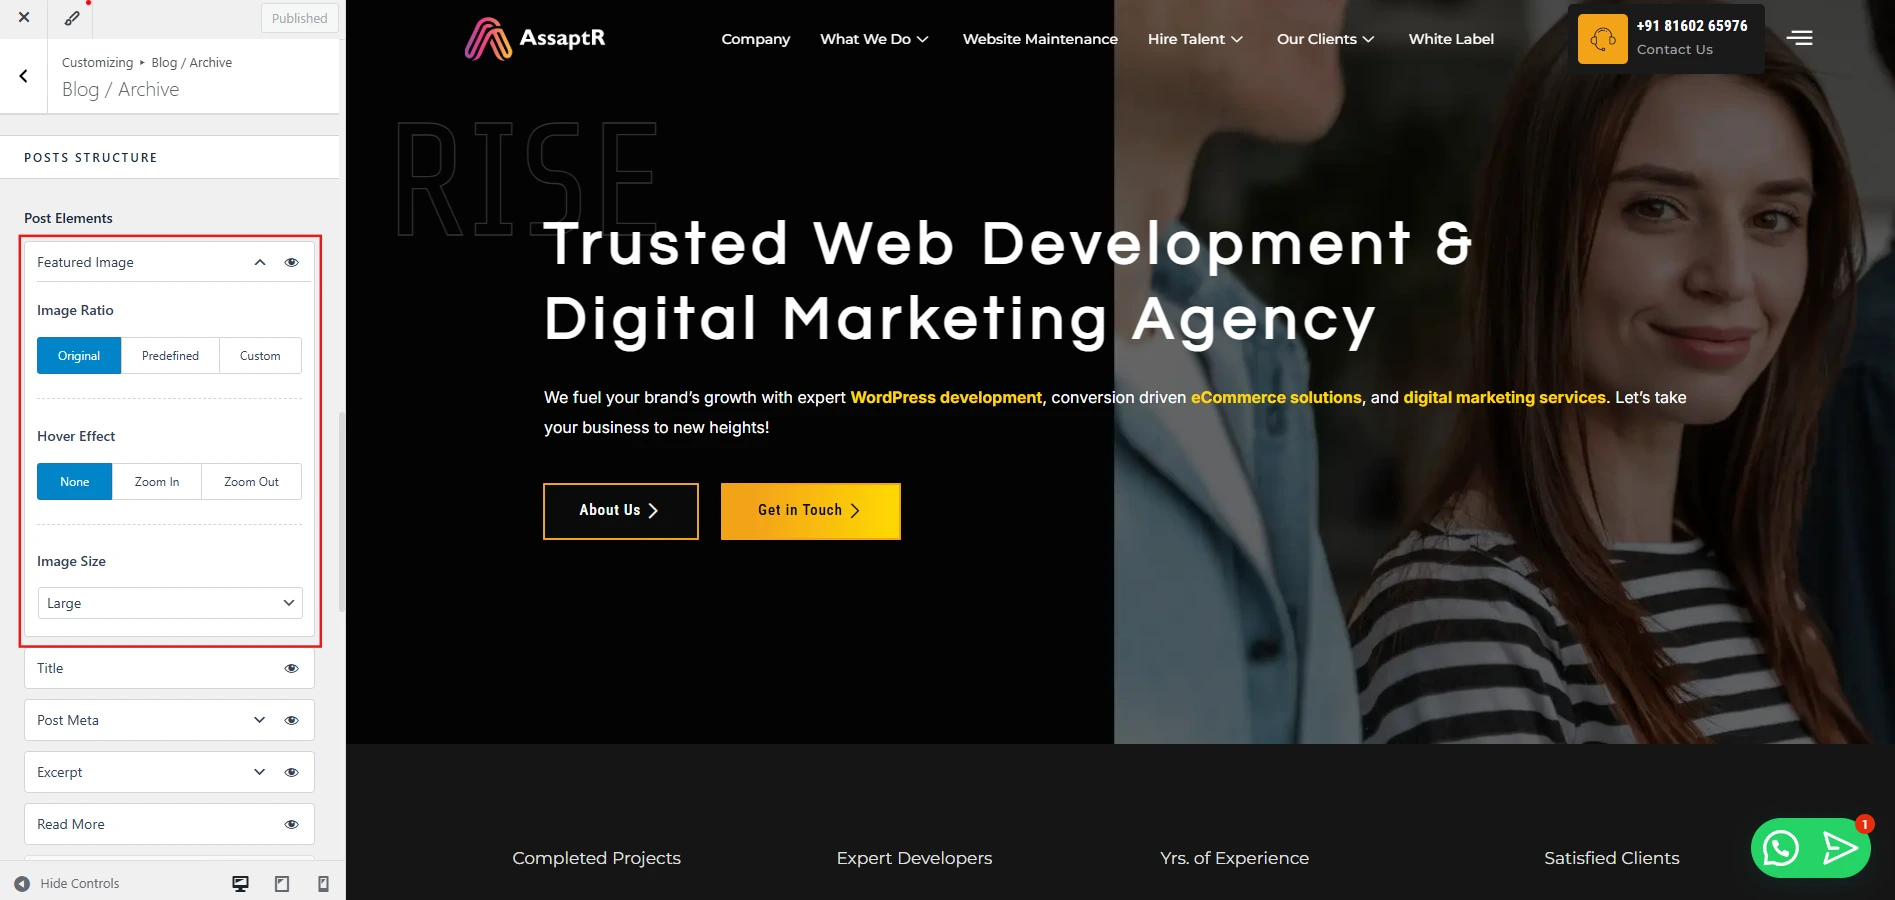
The WordPress Customizer offers a way to tweak various aspects of your website’s appearance, including the dimensions of featured images. This method is particularly relevant for controlling how featured images are displayed on blog post listings, archive pages, and other areas where they appear prominently. Changes made here usually apply globally.
- Access the Customizer: Go to “Appearance” -> “Customize” in your WordPress dashboard.
- Theme Options: Look for a section related to “Featured Images,” “Blog,” or similar. The exact wording depends on your theme.
- Image Dimensions: Many themes allow you to set specific pixel dimensions (width and height) for featured images.
- Cropping Options: Some themes may offer options for how featured images are cropped (e.g., hard crop, soft crop).
- Preview Changes: The Customizer provides a live preview, so you can see how your changes affect the appearance of featured images before publishing them.
- Publish Changes: Once you’re satisfied, click “Publish” to save your customizations.
The Customizer is the place to go when you want to change the look and feel of your featured images. It’s a theme-dependent feature, so the available options will vary. If your theme doesn’t offer featured image customization in the Customizer, you might need to explore other methods or consider a different theme.
Method 4: WordPress Settings (Default Image Sizes)
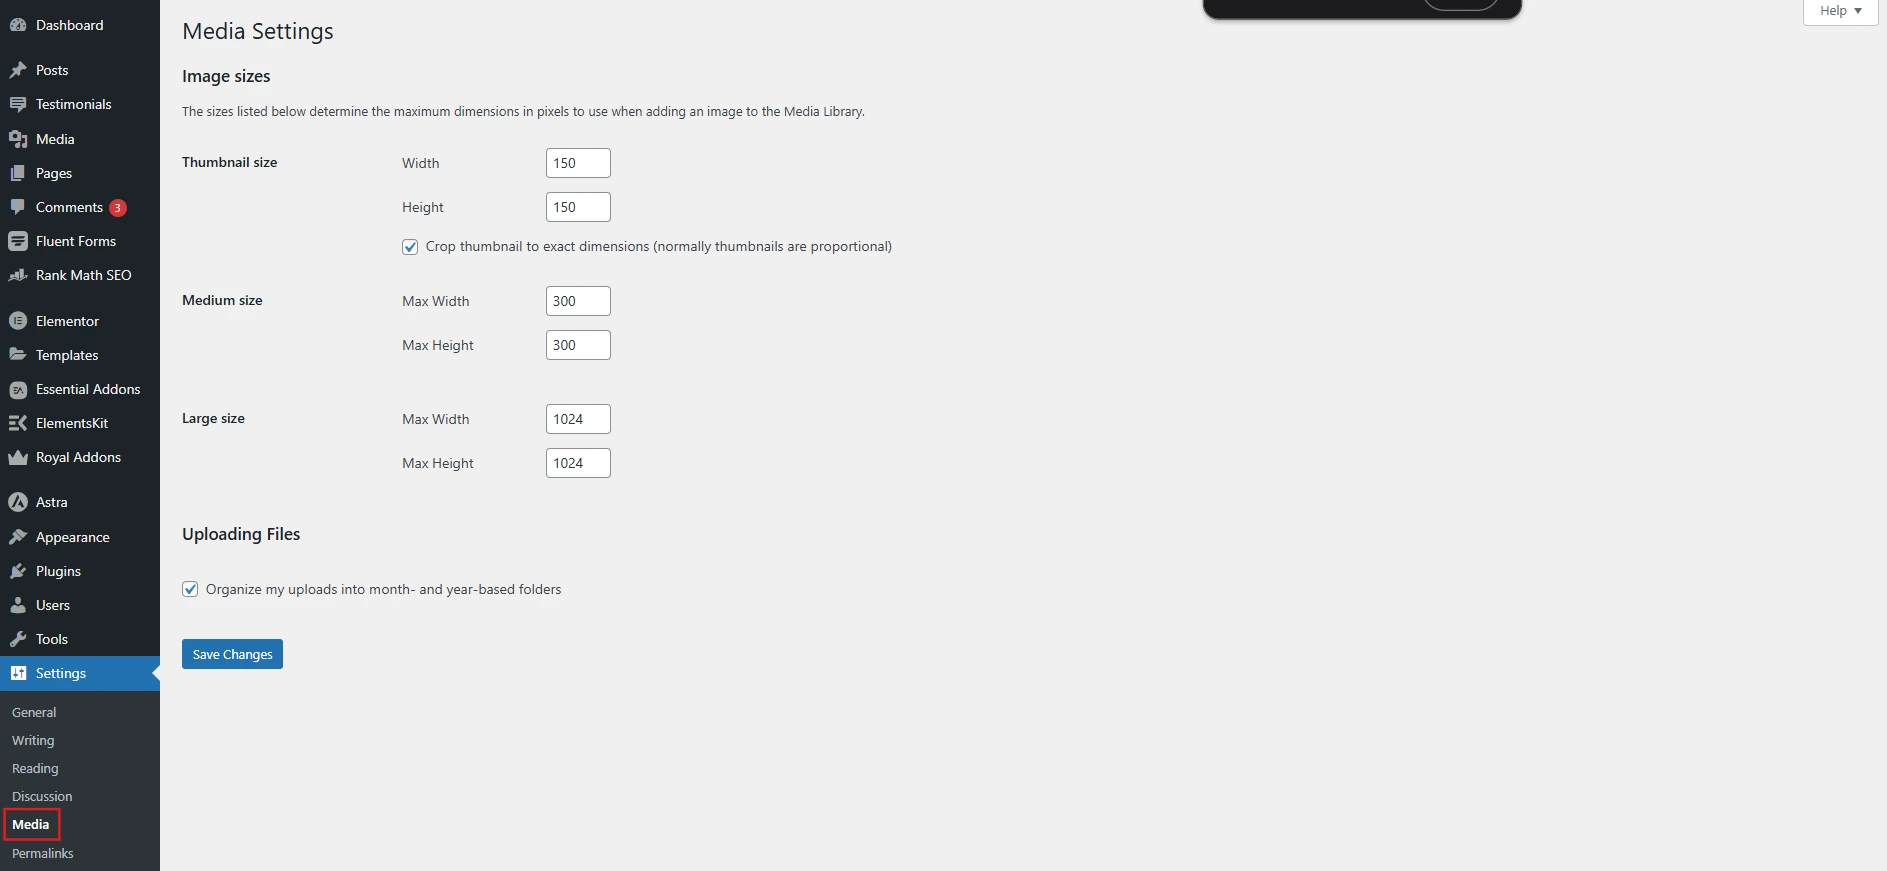
WordPress automatically generates several image sizes when you upload a media file. These default sizes (thumbnail, medium, large, and sometimes medium-large) are configurable through the WordPress settings.
Changing these settings affects newly uploaded images, not existing ones. This method is useful for establishing a baseline for image sizes across your site.
- Access Media Settings: Navigate to “Settings” -> “Media” in your WordPress dashboard.
- Default Sizes: You’ll see fields for specifying the dimensions (width and height) for thumbnail, medium, and large image sizes.
- Thumbnail Cropping: You can choose whether thumbnails should be hard-cropped (exactly the specified dimensions) or soft-cropped (maintaining aspect ratio).
- Save Changes: Click “Save Changes” to apply your modifications.
- Regenerating Thumbnails: If you change these settings, you’ll likely need to regenerate thumbnails for existing images using a plugin. This ensures the new sizes are applied to previously uploaded files.
Adjusting default image sizes is a good way to establish consistency and ensure that WordPress generates appropriate sizes for your content. Remember that these settings only affect future uploads. For existing images, you’ll need to use a plugin to regenerate thumbnails after changing these settings.
Method 5: Using a Plugin (Easier for Bulk Changes)
Using a plugin is often the most efficient way to manage image sizes in WordPress, especially when dealing with bulk changes, image optimization, or regenerating thumbnails.
Several excellent plugins cater to these needs, offering features that go beyond the built-in WordPress functionalities. Three popular options are Regenerate Thumbnails Advanced, Smush, and EWWW Image Optimizer.
- Regenerate Thumbnails Advanced: This plugin specializes in regenerating thumbnails for existing images after you’ve changed default image sizes or switched themes. It allows you to select specific images or regenerate all thumbnails at once, ensuring consistency across your media library.
- Smush: Smush focuses on image compression and optimization. It automatically compresses images during upload, reducing file sizes without significant quality loss. Smush also offers bulk smushing for existing images and can handle resizing to some extent.
- EWWW Image Optimizer: EWWW is another powerful image optimization plugin. It offers various compression methods, including lossless and lossy options, and can optimize images both on your server and using cloud-based services. EWWW also includes resizing and scaling functionalities.
These plugins offer a range of features, from simple thumbnail regeneration to comprehensive image optimization and resizing. They can significantly streamline your image management workflow, especially if you have a large media library or frequently change image settings.
FAQs About Changing Image Size in WordPress Blog Posts
Why is it important to optimize image sizes in WordPress?
Optimizing image sizes is crucial for website performance. Large image files can significantly slow down page load times, leading to a poor user experience and negatively impacting SEO. Smaller, optimized images ensure faster loading, improving user engagement and search engine rankings.
How do I know what the ideal image size is for my blog posts?
There’s no single “ideal” size. Consider your theme’s layout, the content area width, and the image’s purpose. Balance visual clarity with file size. Experiment and check how images look on different devices. Tools like Google PageSpeed Insights can help analyze your site’s image optimization.
Can I change the size of images I've already uploaded to WordPress?
Yes, you can change the size of existing images. You can use the Media Library to edit individual images or a plugin like Regenerate Thumbnails Advanced to regenerate thumbnails after changing default image sizes. Plugins are especially helpful for bulk changes to many images at once.
Conclusion
Optimizing images is crucial for a successful WordPress blog. Understanding image resizing methods improves website performance, enhances user experience, and boosts SEO.
From the Block Editor to plugins, WordPress offers tools for various needs and skill levels. These strategies ensure your content looks great and loads quickly.
This guide covered five key image resizing methods, empowering you to control your media. Whether tweaking individual images or making bulk changes, these techniques help optimize for maximum impact.
Put these techniques into practice and see the positive impact. Experiment with sizes and formats. Explore the plugins for greater control.
Got questions about image optimization? Let’s chat! We’re ready to help you make your WordPress blog shine. Reach out and let us assist you in achieving your image goals.
Let Us Optimize Your WordPress Images
We encompass a wide range of solutions, including eCommerce development, WordPress development, mobile app development, and digital marketing.
SUBSCRIBE NOW
Subscribe to AssaptR, our monthly look.
Contact info
- +91 81602 65976
- hello@assaptr.com
- Maple Trade Centre, Memnagar, Ahmedabad, Gujarat 380052